Wednesday, 21 December 2011

Christmas gingerbread

This is a wonderfully easy and tasty recipe that makes the kitchen smell amazing while the gingerbread is cooking, and looks lovely once decorated, and possibly strung up in garlands around the house. They last well too, so can be packaged or boxed up and given to people as presents or when you have visitors over the Christmas period, and they'll continue to taste good!


To make 16-20 medium to large gingerbread biscuits you will need the following ingredients:
  • 350g plain flour
  • 75g caster sugar
  • 75g dark soft brown sugar
  • 100g unsalted butter
  • 1 egg
  • 3 tbsp golden syrup
  • 1 tsp bicarbonate soda
  • 2 tsps ground ginger
  • 1 tsp ground cinnamon
  • a tiny pinch of salt
  • Icing sugar, water, food colouring and sprinkles etc (if you fancy) for the biscuit decoration
Method:
  1. Set the oven to 180 degrees C (350 F/gas mark 4) and simply mix all the dry ingredients together in a large bowl while making sure there are no lumps of dark brown sugar left in the mix.
  2. Make a well in the middle and mix in all the remaining ingredients (a bit of olive oil on the measuring spoon stops the golden syrup from sticking), then using your hands form the mixture into a ball of dough.
  3. Roll out the dough on a floured surface, with a floured rolling pin, until it's about 5mm thick.
  4. Cut out your biscuits and remember to make holes in the top before they go into the oven if you are planning on hanging the biscuits up as decorations. Place on greased and lined baking trays and cook for 9-10 minutes, checking regularly until they are light golden brown.
  5. Let the biscuits cool on the baking trays before turning them onto a wire cooling rack. Check to make sure the holes haven't closed up.
  6. When they are completely cool, follow instuctions on the side of your icing sugar box to make icing and pipe onto the biscuits into Christmassy designs!

I went for "Merry Christmas" written on the gingerbread biscuits and strung up on string as a garland.


Alternatively, you can attach string or ribbon to individual biscuits and give them as smaller gifts for friends and family:


Have a SSSSSSSSSSuper Christmas!!

Salt dough Christmas decorations

Salt dough is a miracle. The fact that you can make this dough so easily and then use it to make any shaped and sized creation you like blows my mind.

I rustled up some dough a few days ago, then cut out some simple Christmassy shapes, cooked, painted and varnished them et voila! Some lovely, homely decorations!

To make your own salt dough decorations you will need:
  • plain flour
  • water
  • salt
  • mixing bowl
  • rolling pin
  • baking tray
  • greaseproof paper
  • a selection of cookie cutters
  • skewer/kebab stick
  • acrylic paint, poster paint or spray paint
  • varnish
  • paint brush
  • thread (for hanging them)
  1. Simply mix 2 cups of plain flour, 1 cup of salt and 1 cup of water in a bowl, and then knead on a lightly floured surface for 5-10 minutes (this makes it nice and smooth). Let the dough rest on the side for 20 minutes before rolling it out.
  2. Roll out the dough to the thickness of a pound coin (or the thickness you require) and cut out the shapes using your chosen selection of cookie cutters, remembering to make a hole at the top of each shape with a skewer before they go into the oven.
  3. Place the shapes on a baking try lined with greaseproof paper and cook in an oven no hotter than 80-90 degrees C (200F/Gas Mark ¼) - this cool oven will dry out the decorations rather than actually cook them - for about 3-4 hours. Or they can dry at room temperature, but that takes about 30 hours!
4. I used gold spray paint to colour my decorations after using a normal white emulsion as a base layer. This gave the gold a stronger effect. With adequate drying in between each layer, I then painted letters to spell out festive words on a few decorations in black acrylic paint, in order to make a few little garlands.


5. Last but not least came a layer of everyday varnish to seal the salt dough and make them last longer, threading some thread through the holes, and adorning the christmas tree with them!


Thursday, 1 December 2011

Better late than never: Advent calendar!


The countdown to Christmas has now OFFICIALLY begun, despite the Coca Cola advert being aired on ITV nearly a month ago and triggering a mad, premature rush into Christmas. I almost can't quite believe it's December. Apart from being so mild for this time of year - I honestly saw a tree on my road with pink blossom on its branches this morning, what is going on with the weather!?! - where have the past 12 months gone? It only feels like a couple of months ago, at most, that Jim and I were choosing last year's advent calendar - it was a toss up between Winnie the Pooh and Toy Story. Oh decisions decisions...

Anyway, to save on such brain-aching dilemmas this year, a week ago I (optimistically) told Jim I would make him an advent calendar. So, using an old cork notice board, and delving into my box of fabric offcuts, I managed to pull together a few festive looking materials that I could cut, sew and glue into something resembling a 24-pocketed, chocolate-filled wall hanging.


All you need to undertake a similar project (probably best saved til this time next year now!) is:
  • A cork board (mine was about 30x50cm and slightly on the small side if I'm honest)
  • Drawing pins
  • PVA glue
  • Various bits of festive-coloured fabric and felt
  • Ribbons, sequins and other decorations
  • Pencil, paper, scissors, needle, pins and thread
  • Chocolates!


I started by hemming a large stripey piece of fabric after pinning it in place with 4 drawing pins, so that it fitted exactly on the cork part of the board, inside the wooden frame (modelled by Ted the dog):


I then cut out 24 squares, using a paper template, from white and red felt to use as the pockets, after making sure they would all fit on the backing fabric.

Next, I drew several Christmassy templates onto paper and used these to cut out 24 shapes from scraps of fabric.

I positioned all the pieces of fabric on the cork board to make sure it all fitted before sewing/gluing anything in place (again, modelled by Ted):


Happy with this, I used some everyday PVA glue to stick the shapes securely onto the red and white squares. While waiting for these to dry I carefully pencilled in the numbers of the calendar onto the top right corner of each square to make sure they were all a similar size, before sewing over the pencil with black thread:


Next, to add a bit of detail I glued on a few red beads as berries on the holly shapes, some tiny gold stars onto the top of the christmas trees, and sewed some thin ribbon onto the present shapes:


All that was left to do was to fix everything together: starting with the main stripey piece of fabric I sewed the hem using the sewing machine, and then pinned all the squares in place, before sewing round the sides and bottom of them to make 24 pockets:


Finally, fill each pocket with some (preferably non-melting) chocolates and sweets and let the count-down begin!!

Tuesday, 29 November 2011

Shrunken cardigan part 2: warm winter mittens

After my small, woollen cushion project, the remainder of my cardigan, still too small to consider wearing even as a tiny shrug, consisted of just the shoulders and sleeves:


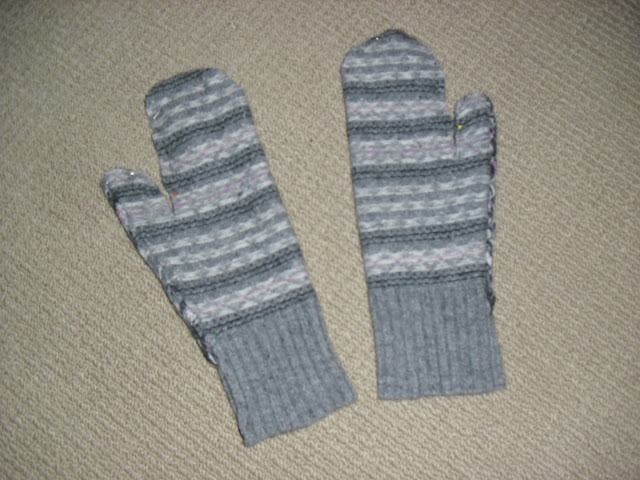
Having seen a wrist-warmer project using the cuffs of an old jumper elsewhere a few years ago, I decided to attempt to make a pair of mittens, similarly using just the sleeves of the cardigan:
 
All I did was:

Cut off as much of the sleeves as needed to make the mittens, using the cuff as the part that will go around the wrist/arm/elbow (you can obviously make the mittens as long or as short as you like):


I then turned the sleeves inside out and measured a basic hand/mitten shape on the sleeve from the cuffs upwards, and marked it with either a few pins, or some fabric chalk, before cutting out the mittens and pinning the finger ends together:


I checked that the mittens and finger sections fitted on my hands before using a sturdy blanket or back stitch (see here for different types of stitching) to sew the finger part of each mitten together:


And finally, a pair of mittens ready to keep out the winter cold!


Feel free to add embellishments in the form of buttons, ribbons and bows to jazz up your pair!

Wednesday, 23 November 2011

Shrunken cardigan part 1: cosy cushon cover

It has taken me a good few months to realise that no matter what setting you put our washing machine on, and no matter what temperature, it will do something completely different once the clothes are in it and spinning around - it has a mind of it's own. So, although immediately disgruntled, I soon got over the fact that a few weeks ago, one of my favourite woollen cardigans came out of the washing machine 10 times smaller than when it went in, and barely big enough for a barbie. It was bound to happen one day.

But, as they say, every cloud has a silver lining of unravelling woollen thread, so to make the most of my shrunken winter cardi, I decided to transform it into a mini cushion cover, with built in buttons!


To rectify the same sad situation if you happen to experience a washing machine disaster, or even if you fancy purposefully cooking an old piece of knitware in the machine, you will need:
  • a woollen cardigan or jumper
  • needle, pins and thread
  • a cushion (the size depends on the size of your shrunken item)

1. After your jumper/cardigan has been suitably resized in the washing machine in a 60 degree spin, trim off the sleeves, shoulders and neck in one go, until the body left is the correct size for your cushion.

2. Turn the item inside out and pin along the top and bottom edges, then sew along these sides, either by hand or with a sewing machine, and if you need too, sew along the two sides to ensure it fits the cushion snugly.


3. Turn the cover back round the right way, and voila, it is complete!

Monday, 24 October 2011

Button lampshade

I was given a plain, dark red lampshade on a dark red porcelain base by my aunt, which goes perfectly with the subtle red theme in the bedroom, on the bedside table. However, over the weekend I decided that the red needed slightly toning down/lightening up to blend with the other furniture and bits and bobs in the bedroom...


Materials:
  • old lampshade
  • fabric
  • buttons
  • pva glue
  • needle, thread and pins
  1. I cut a rectangular length of cream material that was left over from the bedroom curtains and pinned it over the red lampshade in order to see whereabouts the ends of the fabric would overlap. At this point I folded about 1/2 and inch of one edge of the material under itself and pinned it into a hem.
  2. I then glued the fabric lightly onto the lampshade and held it in place with pegs at the top and bottom while it dried. Then I overlapped the fabric round the top and bottom of the lampshade and used a sturdy needle to sew neatly round the top and bottom, and vertically down the seam where the fabric overlapped itself.
  3. It needed something to finish it off, so I collected lots of similarly coloured buttons from my button tins and sewed them along the bottom edge of the lampshade.

Wednesday, 19 October 2011

Quick and easy bunting

Last night I finally knuckled down and finished off a project I began back in June for two friends' surprise birthday picnic - some good old-fashioned celebratory bunting.

Picnic party time

All you need for a similarly easy (and hopefully much quicker) string of bunting is:
  • Lots of different coloured scraps of fabric - I think bunting looks great when all the fabrics are mismatching and contrasting, so have a rifle around to see what you can find for free, rather than going out and buting any material especially
  • Scissors
  • Triangle template
  • String (As long as you'd like the bunting to be)
  • Needle, pins and thread or sewing maching
 
1. Back in June I began by cutting a triangle template (23cm down the long sides and 17cm along the short side) from an empty cerial packet, and using it to cut out what felt like hundreds of different coloured fabric triangles. I cut about a centimetre off the two top corners so that when the top side of the fabric was folded over the string, the corners didn't stick out.


2. I loosely tacked the top of each triangle over the string with coloured thread so that I would be able to unpick it once I had sewed it properly with the sewing machine.


Unfortunately I then ran out of time before the picnic that I wanted to use the bunting for, so it was strung up slightly precariously on that windy summer's evening, but managed to do a good job of decorating our picnic area on Clapham Common!


3. So, last night after months of unnessecary procastinating I sat down with my sewing machine and stitched a simple running stitch over the string and top edge of the bunting to hold it all firmly in place, and stop each tirangle sliding along the string, once and for all. Then I unpicked the original coloured tacking stitches and voila...


...cheap and cheerful indoor or outdoor bunting for any occasion!

Tuesday, 27 September 2011

Ironing board recuperation

It came as a shock to me a couple of weeks ago when I realised that our ironing board cover had almost completely worn through, considering it is so rarely used, apart from when Jim has a sudden shirt-ironing spurt. So I popped over to Fabrics Galore, my cheeky little fabric haven round the corner on Wandsworth Road and picked out some good quality cotton in order to replace the original ironing board cover.

If you feel like a change of ironing scenery or need to replace a worn away cover, all you'll need is:

  • fabric (preferably heat proof) 4 inches wider all the way round than your ironing board
  • approx 2.5m string
  • pins, needle and thread
and that's it!

  1. I began by laying the ironing board upside down on the fabric and pinning the edges of the material into a loose seam about an inch wide, leaving enough fabric to wrap underneath the board, once tightened with string.
  2. I used the sewing machine to quickly stitch the hem all the way round and then I threaded the string through (this takes a bit of patience!)

3. With the fabric laid pattern side down on the floor, I placed the upside down ironing board on it once again before pulling the string tight, to ensure that the fabric was taught and evenly positioned over the old ironing board cover. I didn't bother removing the old one as it adds extra padding over the metal frame.


4. I then tied the string into a tight bow, making sure the fabric was equally ruched the whole way round the board, and tada...


...a new ironing board cover (with added dangly bits!)

Wednesday, 21 September 2011

The Patchwork Quilt: the finale

You may have noticed that it's taken me rather a long time to complete the patchwork quilt project, but now, finally, it is finished, and I was so so happy last night when I finally stitched the last stitch :)

So, from where we left off last time (The Patchwork Quilt: how it all began) the next few stages took place as follows...


With all my rows stitched together I set about ironing down the seams of the underside of the patchwork so it would lie better once sewn together with the wadding.


I then laid the patchwork on the floor, placed the wadding on top of that and then the undersheet I intended to use on top of that, in order to cut everything to the correct size, making sure that the wadding was about half a centimetre larger all the way round than the material, so that the quilt filled out well when sewn together.


As my patchwork was larger than the wadding, and I wanted to use as much of it as possible, I folded and pinned each side to the undersheet (face to face, and being careful to avoid pinning the wadding) so that it created a nice, 1 inch patchwork border on the underside.


I then removed the wadding, turned the quilt the right way out, and set the folds where I wanted them in the material using the iron. With this done, I set about sewing the patchwork to the undersheet on three sides, leaving all the corners and one end unsewn to fit the wadding.


With the wadding back inside and the material the right way out, in order to make the corners look neat and concise, I folded the corners of the patchwork in on themselves into a triangle by about 8-10cm. I then wrapped the two corners of each triangle around each corner of the wadding, and pinned them into place before sewing by hand.


Next, I pinned the last edge together, folding over the fabric to hide the sloppy edge of the patchwork, and sewed along the edge of the patchwork by hand, with small invisible stitches.

I then used the sewing machine to stitch all the way down the sides of the quilt, leaving about a 1 inch border along each edge, or using the overlap of the patchwork on the undersheet to give a nice border, ensuring that the wadding was spread out flat, right to the edges of the fabric.

FINALLY, I pinned all three layers of the quilt together with about 40 evenly spaced pins, to make sure the wadding didn't move around inside, while I made the same amount of tiny little knots through the top and bottom of the quilt to hold the wadding permanently in place.


And here is the finished thing, that made me smile with so much relief and a little bit of pride!